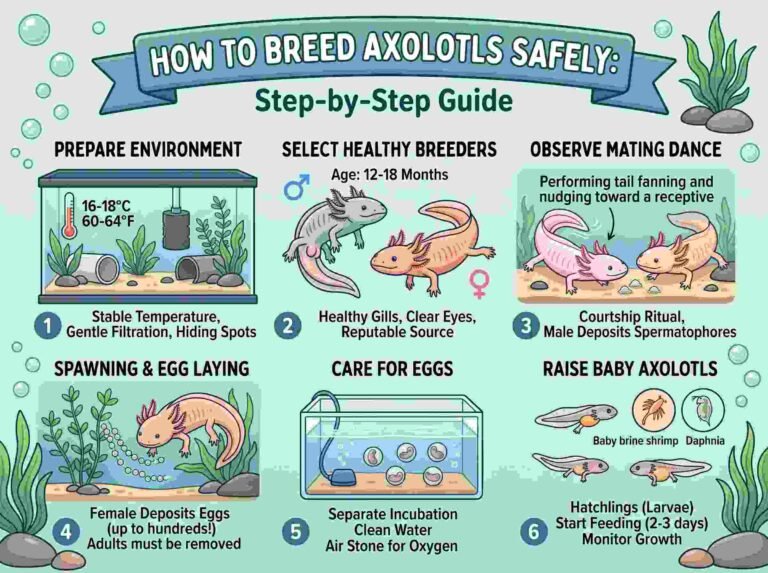
The breeding process of axolotls is an intriguing aspect of their lifecycle that requires understanding of specific environmental conditions to be successful. Generally, axolotls reach sexual maturity between 6 to 12 months of age. Optimal breeding usually occurs in cooler temperatures, around 16 to 18 degrees Celsius, which simulate their natural habitat. As such, aquarists often manipulate water temperature and conditions to induce breeding, utilizing changes in photoperiod as a cue. A gradual increase in water temperature prior to breeding can also encourage axolotl pairs to mate.
During the breeding ritual, males exhibit courtship behaviors, which may include chasing the female and performing a dance-like movement. Once the female is receptive, the male will deposit spermatophores—packets of sperm—on the substrate. The female collects these sperm by passing her eggs over the spermatophores, facilitating internal fertilization. After fertilization, the female will lay her eggs over a period of several days, producing clutches that can range from 100 to 1,000 eggs, depending on her size and health.
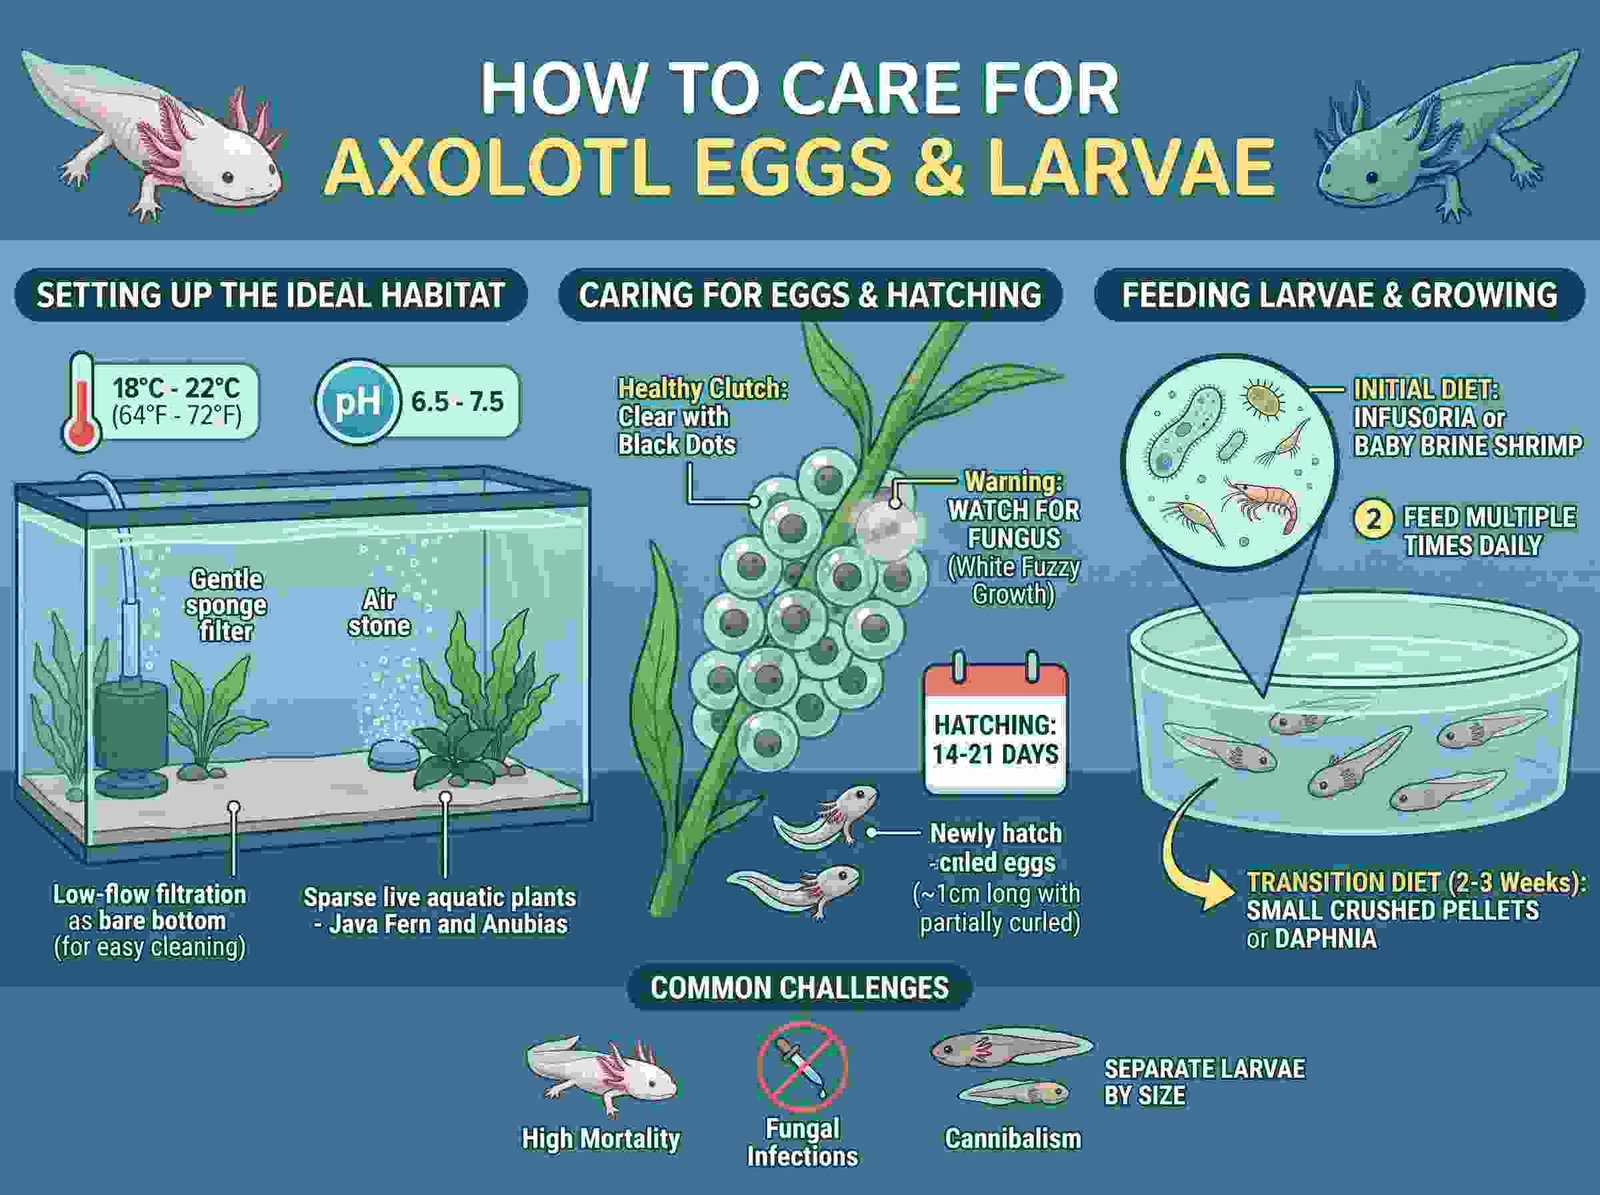
A healthy clutch of axolotl eggs appears as clear jelly-like capsules, with the fertilized eggs showing distinct black dots, which are the developing embryos. Proper care and maintenance of these eggs are vital for successful hatching, which depends significantly on environmental factors such as water quality, temperature, and light exposure. Maintaining optimal conditions can reduce the risk of fungus or bacterial infections that may compromise egg viability. The eggs typically hatch within two weeks, and understanding the critical stages of development during this period is essential for axolotl breeders. With appropriate care, breeders can ensure that many of the eggs develop into healthy larvae, ready for the next phase of their journey.
Setting Up the Ideal Habitat for Eggs and Larvae
Creating a suitable environment for axolotl eggs and larvae is crucial for their development and survival. It is essential to establish water conditions that are optimal for these sensitive life stages. The water quality should be monitored regularly to ensure it remains free from contaminants. A pH level between 6.5 and 7.5 is ideal, along with a temperature range of 18°C to 22°C (64°F to 72°F). Keeping the temperature within this range helps mimic natural conditions, reducing the risk of stress and promoting healthy growth.
The tank size should be appropriate for the quantity of eggs and larvae being raised. A larger tank, ideally at least 10 gallons, provides ample space for swimming and minimizes the concentration of waste, thereby maintaining better water quality. Additionally, a well-circulated environment is necessary; however, care should be taken to avoid strong currents that can be hazardous to the delicate larvae. Low-flow filtration systems are recommended, which can help maintain clean water while preventing the risk of sucking up the small axolotl larvae.
Moreover, it is vital to consider the tank decor and layout. Providing a substrate of fine sand or a bare bottom is preferable, as it allows for easy cleaning. Avoid the use of sharp or hard materials that may injure the fragile larvae. Live plants can be beneficial, as they help maintain water quality and offer hiding spots. However, make sure to select species that are safe and non-toxic to axolotls. Establishing a stable habitat not only encourages growth but also minimizes stress during these critical early stages, paving the way for healthier axolotls in the future.
Caring for Axolotl Eggs: Daily Maintenance
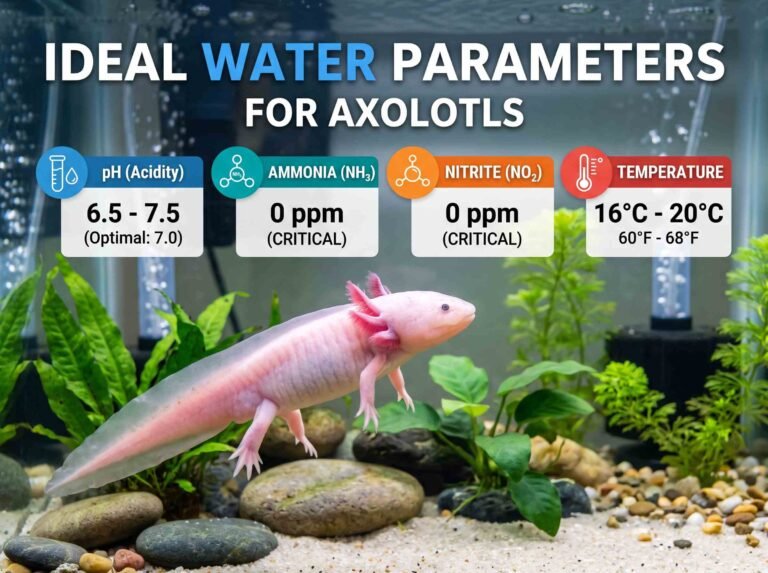
Maintaining the health of axolotl eggs requires diligent daily care. The first step in ensuring their well-being involves closely monitoring the water parameters. It is vital to maintain the water at a temperature between 16°C to 20°C. Regular checks of the pH level are also essential, as it should ideally be between 6.5 and 8.0. Ammonia and nitrite levels need to remain at 0 ppm to prevent toxicity, which can harm the developing embryos.
Performing partial water changes is another crucial aspect of daily maintenance for axolotl eggs. It is recommended to replace approximately 20% of the water every few days to keep the environment clean and reduce any pollutants. When changing the water, it is important to use water that has been dechlorinated and is at a similar temperature to the original water. This practice helps maintain a stable environment, which is beneficial for the eggs’ development.
Additionally, safeguarding the eggs from mold and fungal infections is paramount. To do this, it is advisable to ensure that any uneaten food or debris is promptly removed from the water. Utilizing a gentle filtration method can also help keep the water clean without harming the eggs. If mold does develop, interventions such as adding a few drops of methylene blue can assist in controlling fungal growth.
When handling axolotl eggs, it is crucial to exercise great care. Gently using a fine mesh net to transfer eggs, if necessary, helps prevent damage to their delicate membranes. Touching them with fingers should be avoided, as the oils and bacteria from skin can compromise their health. By ensuring proper maintenance and careful handling, you can significantly increase the chances of successful hatching and healthy growth of axolotl larvae.
The Hatching Process: What to Expect
The process of hatching axolotl eggs is a critical phase for caregivers, marking the transition from egg to larval stage. Generally, axolotl eggs will hatch within a range of 14 to 21 days after fertilization, contingent upon water temperature and overall environmental conditions. It is essential for owners to maintain optimal water conditions during this period, as fluctuations can affect hatch rates.
As the hatching date approaches, owners will observe notable physical changes in the eggs. Initially, the eggs appear as translucent spheres, typically clustered on a plant or substrate. As days pass, you may start to see the development of dark spots within the eggs. These spots represent the developing embryos, indicating that the eggs are healthy and viable. It is during this time that the egg’s surface may also appear increasingly cloudy, which could be a sign of impending hatching.
When the larvae emerge, they will usually do so in a partially curled position, indicating that they are still adjusting after their transition from the safety of the egg. Newly hatched axolotls will measure approximately 1-2 centimeters in length and feature external gills, which are crucial for respiration. Observing their movement can provide insight into their health; active larvae demonstrate vitality, whereas lethargic movements may indicate potential issues.
Owners should also be prepared for the care of newly hatched axolotls by ensuring a stress-free environment with clean, dechlorinated water and appropriate food sources. It is paramount that caregivers monitor the hatchlings closely, as their rapid growth and sensitivity to their environment necessitate attentive husbandry. Ultimately, understanding the hatching process prepares caregivers for effective axolotl care during this formative stage.
Feeding Newly Hatched Axolotl Larvae
Once axolotl eggs have successfully hatched, the newly emerged larvae require immediate access to a proper diet to ensure their health and growth. In the initial stages of their development, axolotl larvae are quite small and depend on tiny food sources that can be effectively ingested. One of the most suitable food options for these young axolotls is infusoria. Infusoria are microscopic organisms that can be found in a wide range of aquatic environments and are typically abundant during the early stages of a freshwater ecosystem.
To rear healthy axolotl larvae, it is crucial to maintain a consistent supply of infusoria. For those who may be unfamiliar with the process, infusoria can be cultured at home by creating a specific environment using materials such as brown leaves and fermented vegetable matter. Some people also prefer to purchase ready-made infusoria cultures from aquaristic supply stores, which can be a reliable alternative to DIY methods.
As the larvae grow and reach larger sizes, typically within two to three weeks, it becomes necessary to transition their diet to include more substantial food sources. At this point, small crushed flakes or baby brine shrimp can be introduced as they provide more nutrition to the developing axolotls. Additionally, providing finely chopped bloodworms or daphnia can also support the growth of larvae and ensure that they are thriving.
Throughout this feeding process, it is essential to observe the growth of the larvae and adjust food offerings according to their size. Overfeeding should be avoided as it can lead to water quality issues and negatively impact the health of the axolotls. Instead, it is advisable to offer small amounts multiple times a day until they reach a mature size. By maintaining a focus on the dietary needs of the axolotl larvae, caretakers can provide an optimal environment for their growth and development.
Common Challenges in Larval Care and Solutions
Caring for axolotl larvae can pose several challenges for aquarists, particularly in the initial weeks of their development. Among the most frequent issues encountered are high mortality rates, fungal infections, and instances of cannibalism. Understanding these challenges is crucial to ensuring a healthy growth environment for axolotl larvae.
One of the primary concerns is the high mortality rate observed in young axolotls. This issue can stem from various factors including poor water quality, inadequate temperature control, and insufficient food supply. To mitigate these risks, it is essential to maintain optimal conditions in the environment. Regular water changes and monitoring of water parameters such as pH, ammonia, nitrite, and nitrate levels will help maintain a stable habitat. Ensuring that the water temperature remains between 18-22°C is also critical for the health of the larvae.
Fungal infections are another common challenge, typically appearing as white, cotton-like growths on the larvae. This condition can occur due to poor water quality or excessive organic matter in the tank. To combat fungal infections, one effective solution is to use antifungal medications specifically designed for aquatic settings. Additionally, promptly removing any uneaten food or organic debris will help reduce the risk of fungal growth.
Cannibalism among axolotl larvae is a particularly alarming behavior that can occur if larvae are left to grow in the same tank without careful monitoring. As they grow, larger individuals may consume smaller ones, leading to significant loss. To address this issue, it is advisable to separate larvae based on size. Keeping them in groups of similar sizes can help minimize the risk of cannibalism and ensure a higher survival rate.
In conclusion, successfully caring for axolotl larvae involves careful attention to water quality, preventive measures against fungal infections, and managing the size of the groups within the tank. By addressing these common challenges proactively, axolotl owners can foster healthier trajectories of their larvae’s growth and development.
When to Transfer Larvae to a Larger Tank
Transferring axolotl larvae to a larger tank is a crucial aspect of their care, as the right timing and conditions can significantly affect their growth and development. Several factors must be taken into consideration when determining the appropriate moment for this transition.
Firstly, the size of the larvae is an essential criterion. Axolotl larvae typically reach a size suitable for transfer when they are around four to six weeks old, depending on their growth rate. By this stage, they usually measure approximately one to two inches in length. If the larvae appear cramped in their current environment, where they can easily escape their food or encounter increased waste levels, it is a sign that they need more space.
Another crucial factor is the development stage of the larvae. As they grow, axolotl larvae undergo various developmental milestones. At around six weeks, they start to develop their limbs and lose their external gills. Observing these changes will help in deciding when the larvae are ready for a bigger tank. Additionally, axolotls are more susceptible to stress, and transferring them during a delicate stage of development can be detrimental; thus, patience is key.
Water quality is a vital consideration for a successful transfer. Larvae require clean, stable water conditions to thrive. If the water parameters in the initial rearing tank are deteriorating—indicated by rising ammonia or nitrite levels—it is imperative to perform water changes or relocate the larvae to a larger, well-filtered tank with suitable water chemistry. A larger tank provides not only more space but also more stability, reducing the stressors that could inhibit larval development.
In conclusion, carefully evaluating the size, developmental stages, and water quality ensures a successful transfer of axolotl larvae to a larger tank, fostering healthier and more robust axolotls in the long run.
Monitoring Growth and Health of Juvenile Axolotls
The early stages of an axolotl’s life are crucial for its survival and overall health. Monitoring the growth and health of juvenile axolotls not only ensures that they are developing correctly but also helps in identifying any potential health issues that may arise. Regular health checks should be a fundamental part of your care routine, as these amphibians can exhibit subtle changes that indicate their well-being.
One of the first indicators of a healthy juvenile axolotl is consistent growth. It is advisable to keep a growth log, where you can note the size of your axolotls at regular intervals, such as weekly. During this period, they should grow steadily, and a significant failure to grow can be alarming; this might suggest problems in their environment, such as water quality or temperature issues.
In addition to tracking size, observe the physical features of the axolotls. Look for clear signs of well-being, which include bright coloration and active behavior. Healthy juveniles should swim actively and show curiosity towards their surroundings. If you notice lethargy or a drastic change in color, it may indicate stress or illness.
Moreover, pay close attention to their feeding habits. A healthy axolotl should eagerly accept food, while a decreased appetite can signal potential health concerns. It is essential to provide a suitable diet composed of high-quality pellets, live food, or frozen options. If the axolotls appear not to be feeding or exhibit signs of distress after eating, further investigation into their health status may be warranted.
Finally, monitoring for any developmental abnormalities is crucial during this stage. Look out for irregular limb development, swelling, or skin issues. If any such problems arise, consulting with a veterinarian who specializes in amphibians can provide further insight and assistance. Regular health monitoring combined with proactive care can significantly enhance the quality of life for juvenile axolotls.
Preparing for Adult Care After Larval Stage
As axolotls progress from the larval stage to juvenile and eventually into adulthood, the requirements for their care change significantly. It is essential for caregivers to prepare for these transitions to ensure the well-being and healthy development of the axolotls. This involves modifications in tank setup, dietary adjustments, and alterations in general husbandry practices.
Initially, the tank environment must be adapted to accommodate the growing size of the axolotls. Adult axolotls typically require a larger tank, ideally at least 20 gallons, to provide ample swimming space. The filtration system should also be upgraded, as adult axolotls produce more waste compared to their juvenile counterparts. Ensuring that the tank water remains clean and well-filtered is crucial for maintaining the health of mature axolotls. Additionally, the water temperature should be monitored closely, as adults thrive in cooler temperatures ranging from 16 to 20 degrees Celsius.
Feeding habits undergo significant shifts during this maturation process. While larvae primarily feed on small live foods such as brine shrimp and finely crushed flake food, adults can be introduced to a wider range of foods. This includes larger live foods, such as worms and other protein-rich sources, as well as high-quality pellets designed for adult axolotls. Caregivers should aim to provide a varied diet to ensure nutritional balance while monitoring feeding portions to prevent overfeeding, which can lead to health issues.
General husbandry practices also need attention as axolotls mature. Regular water changes should be maintained to ensure optimal water quality, typically about 20% weekly. Monitoring for signs of stress or illness becomes increasingly important, as adult axolotls may require different handling techniques compared to their larval stages. Adapting to the needs of the adult axolotls will help maintain their health and ensure that they thrive in their aquatic environment.